I’m a former security architect who spent years deep in the world of SIEM deployments and migrations. Over the course of my career, I’ve led more than 20 large-scale projects (and more than 40 individual SIEM implementations if we count them all).
Much of my experience comes from working with Microsoft Sentinel, but the principles and lessons I’ve taken away apply across platforms and technologies.
In this article, I’ll share the lessons learned from those projects, along with the approach I’ve found most effective for running them successfully.
Why have an approach
As an MSSP you bring thought leadership. You are not only an implementation arm of your client. Your client is not the brain, you are not fingers on the keyboard. This means that you don’t ask your client what they want monitored. You tell your client what they want monitored. That’s a huge difference.
And to do that you want a clear plan.
If you don’t have an approach of your own, then the project defaults to the perspective of whoever owns the SIEM implementation on the client side. That’s not optimal from the security monitoring standpoint and it’s a problem for you as an MSSP because it transforms every onboarding effort into a custom engagement.
Why is it not optimal from the security monitoring standpoint?
Because we all have our biases. The longer someone works in security, the stronger their opinions become. In SIEM onboarding projects, you’ll often deal with security leaders who already have a vision of what “should” be monitored. But there’s no guarantee that what your client believes is right for them actually is right for them.
‘Why should we monitor that?’ – your client, probably
And finally, you want to be ready for pushback when your reccomendations don’t align with your clients vision. And it will happen. With clearly communicated, sensible approach you can cut through the debates and save yourself a lot of frustration during the SIEM onboarding process.
As an MSSP you want to do repeatable work as much as you can. As a client you want as close to a bespoke solution as possible. I believe there is a middle ground.
Project phases in theory
If you’ve never been through a SIEM onboarding, the whole process can feel overwhelming. There are many moving parts to think about. And what’s the best way to handle complex projects? Break them down into smaller, manageable pieces.
Before diving into the good stuff, let’s take a moment to talk about the transition from deploying the SIEM to having analysts use it for monitoring.
Project vs operations
As you probably know, the goal of the project is to build a SIEM – we will refer to it as the project phase. Once it’s ready, security analysts will use it for their day to day work which we will call operations.
There needs to be a smooth transition between those two phases, we will call it handover to operations.
‘Your SIEM needs to make two parties happy: your client and analysts who will use it’ – me, in this article
When handing over a SIEM you need to make sure that two groups are happy: your client and analysts who will use it in their daily work. It means that in most cases you will need to:
- Walk your client through the solution.
- Prepare a High-Level Design (HLD) document.
- Train SOC analysts on how to use the platform.
- Obtain formal confirmation from the client that they are satisfied with the solution (an email is usually fine).
There are two models of approaching handover to operations and the second one has saved our butts on many occasions.
The standard model. Project ends, client sends an formal acknowledgement that they are happy with the solution, SOC gets trained, handover is officially done.

The hybrid-operations model [for MSSPs who deliver both Managed SIEM and SOC]: But what if, instead of waiting until the project is fully finished, we begin monitoring as soon as the first alerts land in the SIEM (during Phase 1)?

How does it work? You set the expectation with your client that SOC analysts will start monitoring in the very first week of SIEM onboarding, and you make sure that agreement is written into the contract. This way, you are compensated for monitoring even if the onboarding phase takes longer than originally planned.
The biggest advantage of this approach? It protects you when the project runs longer than expected. I’ve seen SIEM onboardings planned for three months stretch into two years. Without a hybrid operation clause in the contract, that would have meant losing money the entire time.
It also makes handover easier, because your analysts don’t need extra training on the platform if they’ve already been working with it.
If you provide both SIEM and SOC services, consider adopting a hybrid operations model
Project phases and the general security monitoring approach
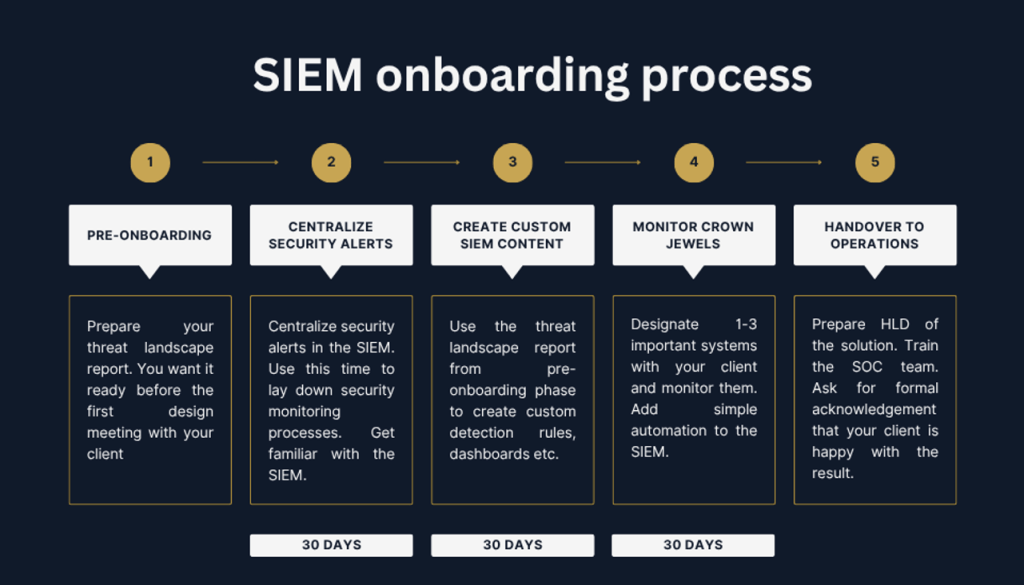
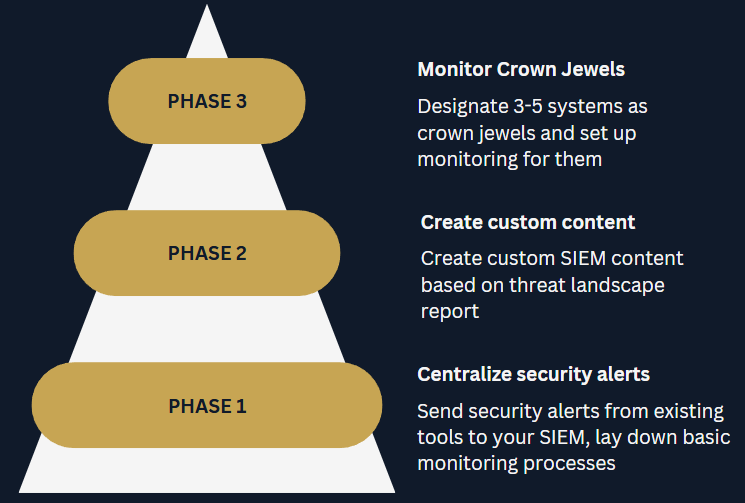
Now for the actual project phases. As you can see in the graphic included with this article, there are five in total. Since we’ve already covered the handover to operations, that leaves us with:
- Pre-onboarding
- Phase 1: Centralize security alerts
- Phase 2: Create custom SIEM content
- Phase 3: Monitor the crown jewels
Each of the project phases takes roughly 30 days to complete. With pre-onboarding done ahead of time and smooth handover you can be done with your onboarding in 100 days.
My general approach to building a SIEM can be found in this article:
It can, in essece, be boiled down to this:
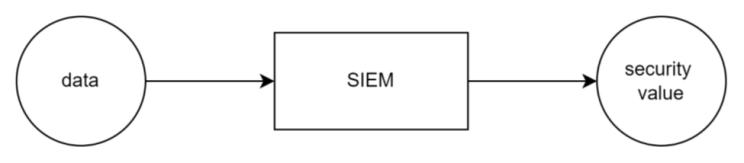
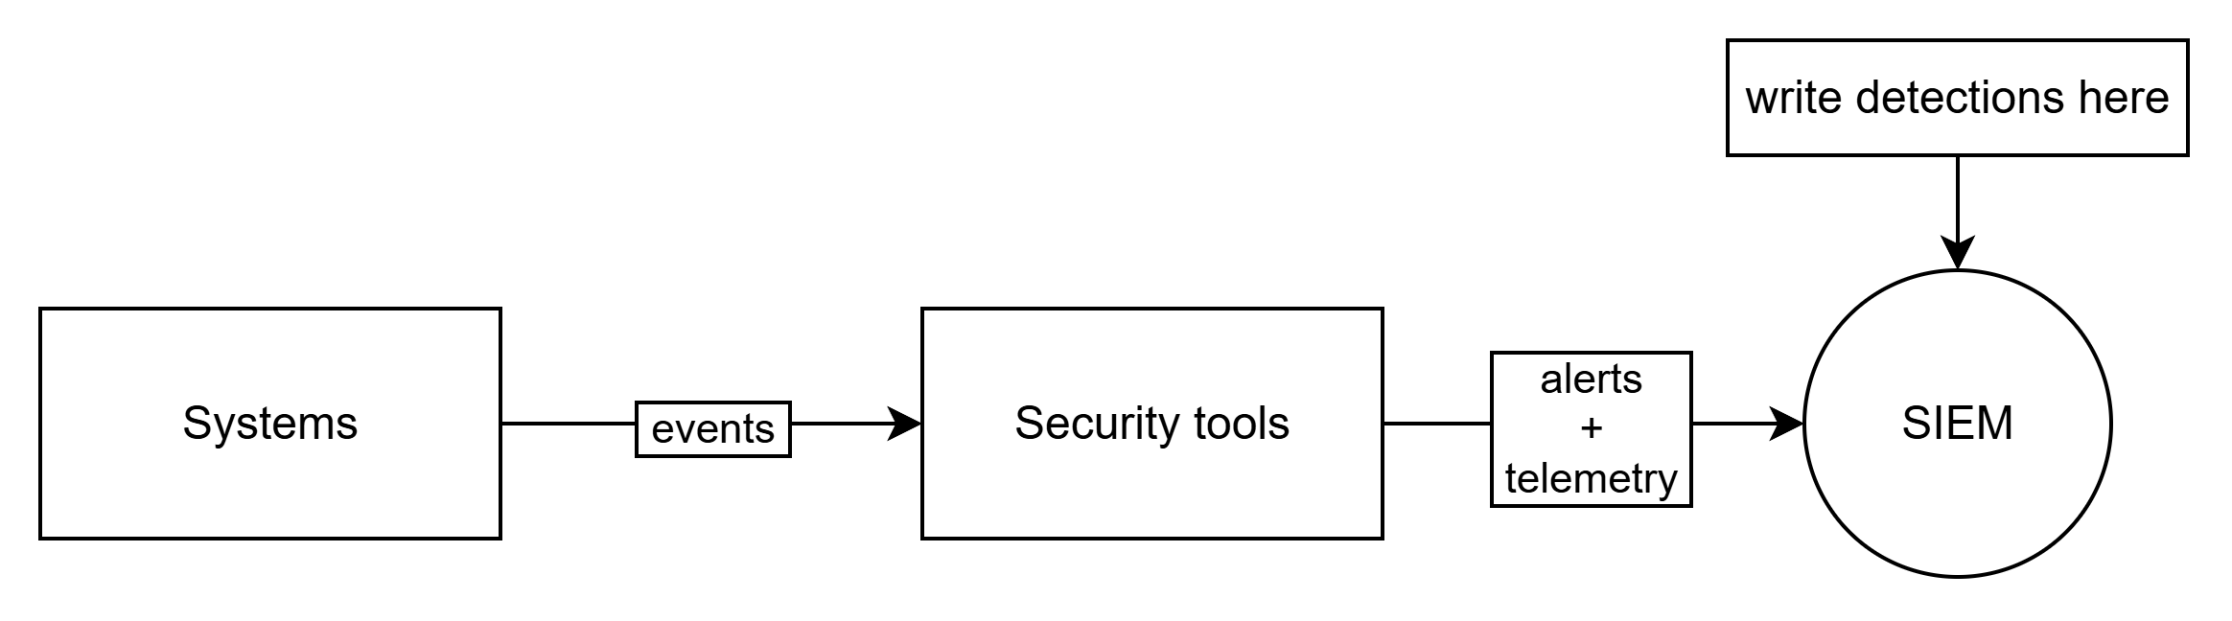
SIEM is a solution that turns data into security value. That security value is realized mostly by detection rules.
The core idea of this approach is simple: rely on something solid, ideally Threat Intelligence, to determine which threats are most relevant to your client’s organization.
If you map those threats to MITRE ATT&CK techniques, it becomes much easier to see which detections can alert on them. Once the detections are in place, it’s straightforward to determine what data is needed to support both the alerts and the investigations that follow.
By leaning on Threat Intelligence you can determine two critical data points in any SIEM deployment:
- what to monitor
- what data to bring in
And that brings us to our pre-onboarding phase.
Pre-onboarding
You should start SIEM design meetings with a clear picture of how you plan to approach the project and what the client can expect. I always pushed to have detection rules ready before the kick-off meeting for exactly that reason. This phase is about showing the client that you understand their security monitoring needs. Here’s what we want to achieve:

This is what you do step by step:
Step 1: Send a questionnaire
Don’t complicate it. Use the questionnaire to understand the client’s environment, and treat that as one of the inputs to your Threat Intelligence report. Your questions can be very specific or fairly broad.
Whether the client runs entirely on Linux, operates fully in the cloud, or maintains a large OT footprint will be critical for producing an accurate Threat Intelligence report.
It doesn’t have to be a questionnaire. You can just meet with the client. If you choose to do so, make sure to bring your CTI analyst with you!
Step 2: Create a threat landscape report
Again, no need to overcomplicate things. What you really want is a simple PDF report that outlines which threat actors are relevant to your client, plus a clear heatmap to showcase it. That’s exactly what I used to ask my CTI analysts for:
- Tell me which threat actors are most likely to attack my client.
- Tell me what techniques are most used across those threat actors
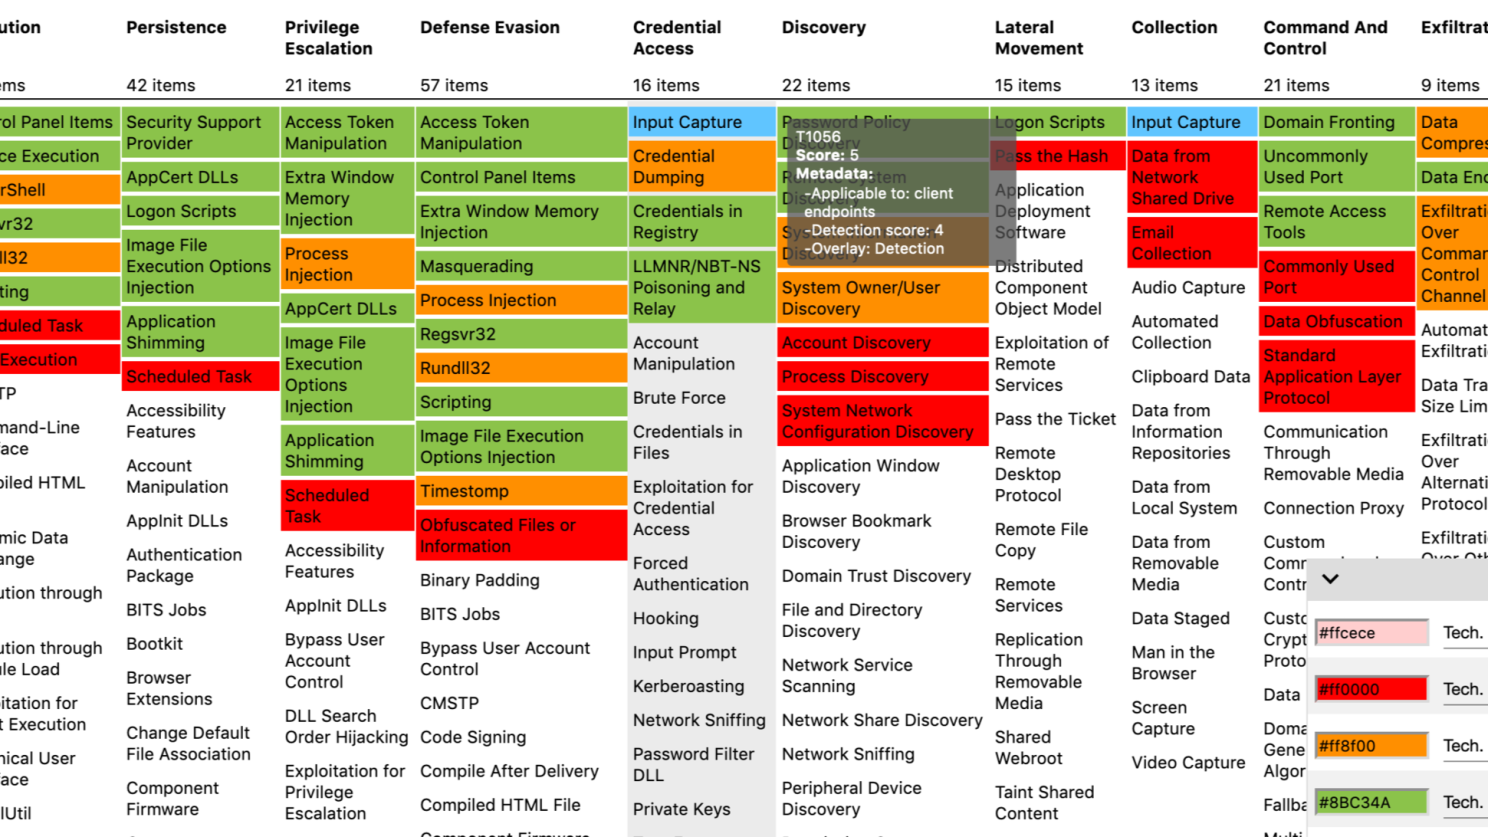
- Map those techniques in a MITRE navigator or similar tool

Before writing the full report, I like to pull the raw JSON file used to generate the map and extract the top 5–10 most frequently recurring techniques. These then become the basis for our detections.
Step 3: Create detections based on top 5-10 techniques
While the Threat Landscape report is being written, you want to start creating detections based on the top 5-10 techniques.
Why a range (5-10) instead of a fixed number?
Because you won’t always be able to outline a clear top ten, and it’s not possible to write detections for every technique (for example, what do you even write for T1566 Phishing?). What you’ll usually see in these reports is three techniques that stand out as heavily used, followed by a cluster of others that are used at roughly the same level.
In this step, we’re essentially addressing the security value part of the equation:

Now, this is not an article about detection engineering and you can write your detections however you want. But If I may suggest one thing (of course I may, it’s my article) consider doing two things for each detection you wrtite:
- test it
- write an SOP
Having a detection rule you think works but really doesn’t is worse than not having a detecton at all. Testing allows you to gather evidence that not only helps you write SOPs but also demonstrates to the client that you’re delivering SIEM content that works.
Step 4: Add detections to your ‘detection library’
Remember when I mentioned that MSSPs value reusable content while clients prefer custom solutions?
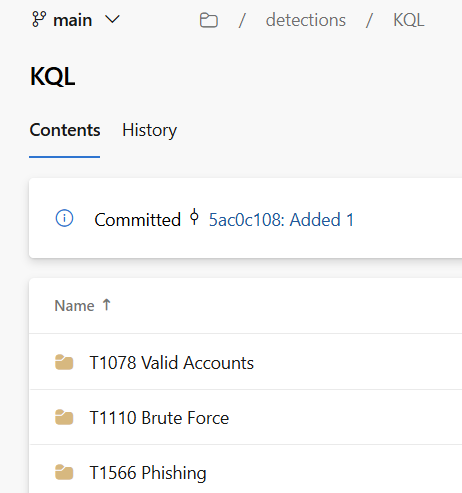
The rules you create should be reusable. You’re not writing them for a specific client, but for a specific techniquem and techniques show up again and again across different clients (looking at you T1078 Valid Accounts).
Add these rules to your SIEM content library, ideally in a version control system like GitHub or Azure DevOps. If you’re not ready to manage your content as code, that’s ok – store it in SharePoint or even in Excel. The key point is to make sure your detection rules are saved, organized and ready to be used for your next clients.
Step 5: Map detections to data
Once you have draft detections, you’re in a good position to determine what data is needed to support them and any follow-up investigations.
Figuring out which data sources are useful for investigations can sometimes be tricky. The MITRE website is a great resource for this: https://attack.mitre.org/datasources/
The goal of pre-onboarding is to set up a data-driven approach to SIEM deployment. A clear plan builds client trust and reduces pushback later, especially if the SIEM misses an alert.
Experience can be debated, but data speaks for itself. With a list of techniques to cover (or ideally detections already drafted) and data sources to onboard we’re ready to move into the first phase of onboarding.
Kick-off meeting (my playbook)
In the pre-onboarding phase we:
- Listed MITRE techniques most likely to be used against our client.
- Drafted detections aimed to detect the use of those techniques.
- Mapped those detections to data that needs to be sent to the SIEM.
We are now ready to kick off the SIEM onboarding project with the client. Here is how I approach these meetings and some of the points I usually make almost word for word:
‘SIEM is a tool that takes in your data and returns security value’

I say this every time. Then I like to explain that 80% of that security value is realized by applying detection logic to this data.
I stress how important it is to understand what detection rules to create, because it informs what data needs to be sent to the SIEM.
Then I show the detection rules drafts to the client.
They are always pleasantly surprised to see detections rules being prepared so early in the engagement. I take some time to explain how we arrived at those detections, then I show the threat landscape report, MITRE navigator map and stress that our approach is data driven,
Bonus points if you take a dig at your competition:
‘You see, other MSSPs give you pre-built detection packages. We tailor our detections to you‘
Now, this part is very SIEM dependent, but if you use a solution that is priced per volume ingested, you want to explain how you plan to store this data. This is how I like to explain SIEM data management:
- Data used for running detection rules → hot storage
- Data used for context & investigations → cold(er) storage
- Other data → filter it out
Feel free to explain how this is going to result in cost savings to the client. If you can try to calculate it ahead of time. This is a very useful data point in SIEM migrations.
Lastly, and probably most importantly, you want to explain the SIEM onboardng phases. As you already know, my approach has three of them, each taking 30-days.
- Centralize security alerts (30 days): your aim is to send security alerts from all existing tools to the SIEM and lay down basic security monitoring processes.
- Create custom content (30 days): implement your detection rule drafts, test those rules and write clear SOPs
- Monitor crown jewels (30 days): designate 1-3 important systems with your client and write detections specifically for them
That’s it. We’ve set expectations, laid down the timeframe, explained the approach. We’re ready to get to work.
Phase 1: Centralize Security Alerts
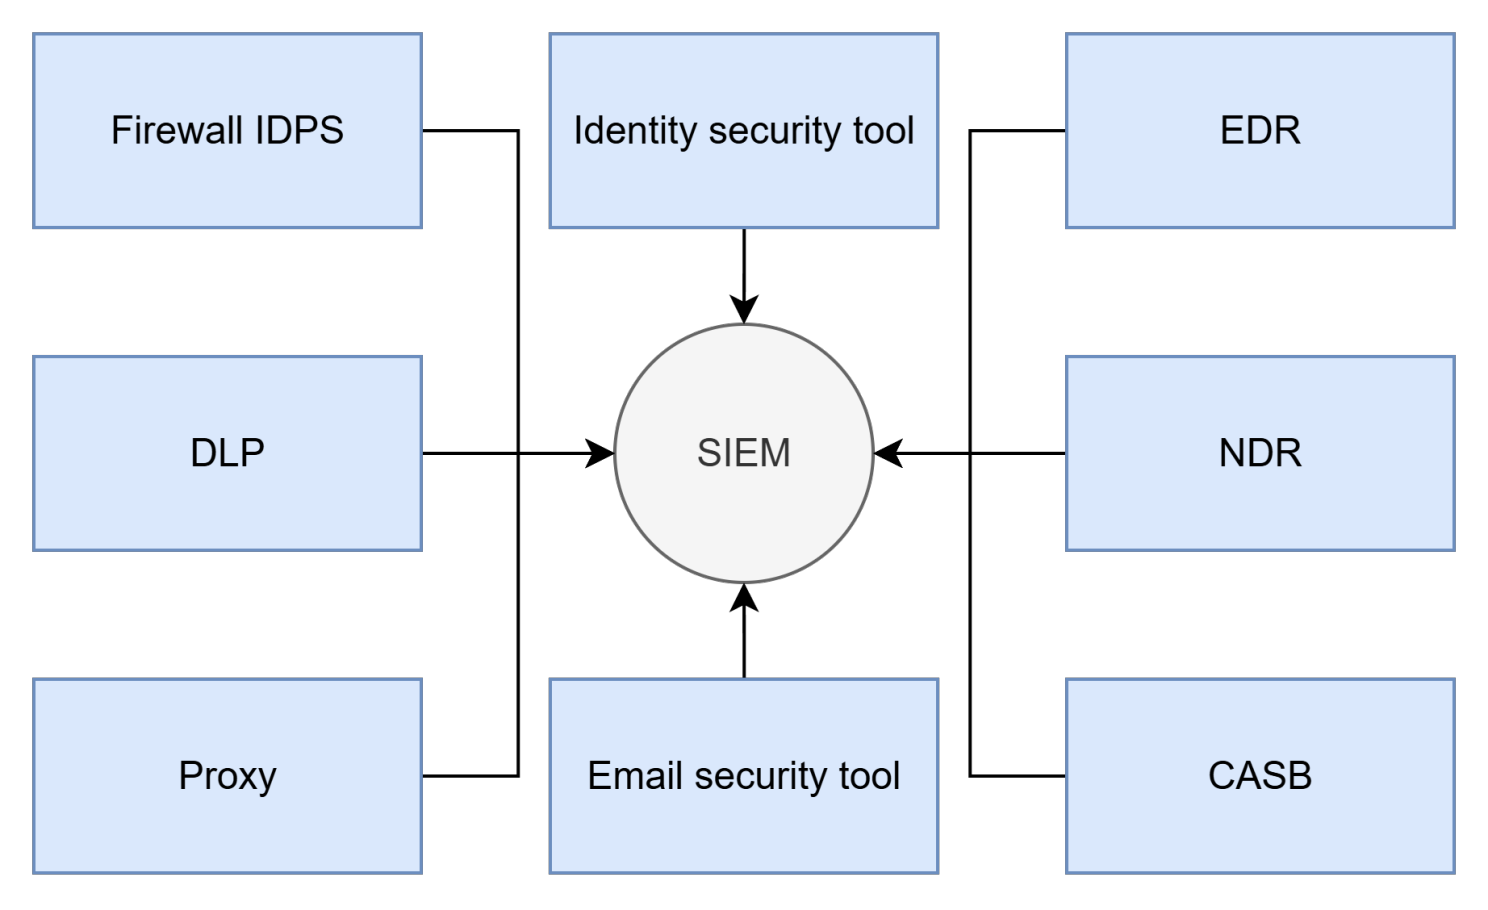
Most clients looking to stand up a SIEM already own a range of security tools, many of which generate alerts. That’s free security value right there. The goal is to send those alerts into the SIEM, fine-tune them, and establish basic security processes to support monitoring.
By centralizing alerts in the SIEM, analysts, threat hunters, incident responders, and engineers can work from a single console instead of juggling nine different tools. It also enables consistent fine-tuning.
Different security tools often use their own methods for generating alerts – policy matches, custom detection rules, UEBA modules, detection engines, and more. Fine-tuning each one in its native console requires specialized knowledge. Doing it in the SIEM, on the other hand, only demands skill in a single query language, making exclusions easier to manage and document.
When fine-tuning, it’s important to leave room for the custom detection rules that will be developed in the second phase of onboarding and to balance this with the SOC’s capacity. A good starting point is aiming for a 50/50 split between alerts from existing tools and alerts from custom detections. For example, if your SOC can handle 50 alerts per day, target 25 from security tools and 25 from custom rules.
Now, when it comes to laying down basic processes for SOC monitoring I like to start with the bare minimum. In my mind, those are the two processes that I like to have established as the bare minimum:
- Co-management. Essentially look to answer the question of who owns what (rememer that this guide is best used for MSSPs that deliver both Managed SIEM and SOC services!). This process is our way of managing expectations. People responsible for selling the service sometimes get creative :). We want to establish clarity right off the bat to avoid unpleasant surprises further down the road.
- Escalation path. A list of contacts on the client’s end. Depending on your co-management setup it can be very simple where the single escalation path is your client’s T3 distribution list. Some clients may want specific alerts be sent to responsible teams – e.g. database related alerts to DB admins, AWS alerts to AWS teams etc.
And that’s it.
Alerts are in, finetuning has concluded, you’ve established basic processes. You can already start monitoring. Or you can wait until you’re done with the project phase. Up to you, honestly.
The last thing you want to do is to meet with your client, explain what was done, share your findings (you will have findings after you’re done with finetuning). If the client is happy, you can move to the next phase of onboarding: Create custom SIEM content.
Phase 2: Create custom SIEM content
The goal of pre-onboarding was to build a list of techniques most likely to be used against the client. This phase focuses on creating detections that trigger when those techniques are used in the client’s environment.
But where exactly do you create those detection rules? We have options. Which one you choose depends on your client’s budget.
Consider a simple example: an EDR collects endpoint events and turns them into telemetry. You can create detection rule in the EDR and send only alerts to the SIEM. Or you can send the telemetry to the SIEM and create detections there.
Option 1: detections in downstream security tools
If you work with SMBs you’ll notice that cost is often a concern. A budget-friendly option for small deployments is to avoid sending raw events to the SIEM and instead write detections in downstream security tools.

This approach, while being cost efficient, means you will not have data to support your invsetigations in a central location and your analysts will still have to juggle multiple tools for their analysts.
Option 2: detections in the SIEM
In most cases, you’ll want to send telemetry to your SIEM and build detections there. This supports one of the core purposes of a SIEM: serving as a central store of security-relevant data. The aim is to send data that powers detection rules as well as data that supports alert investigations.
This approach can also work for budget-conscious clients, since you usually have control over what gets sent to the SIEM. If your EDR process events are too noisy but other sources produce an acceptable volume, keep the high-volume logs in the EDR and send the rest into the SIEM.
Detection engineering at home
You know which detections to create and where to put them. Now it’s time to actually write them.
The process of designing, writing, testing, and maintaining detections is called detection engineering. It can become complex, but for this article I want to focus on three elements that I see as the bare minimum for MSSPs to consider:
1. Store your detections in a structured way. As mentioned in the pre-onboarding section, the goal is to make them reusable. You are not building a one-size-fits-all package but detections aligned to MITRE techniques. If you are ready to manage them as code, use GitHub or Azure DevOps. If not, Excel sheet is fine. Try to organize your repository to reference query language of the detection and MITRE technique it addresses:
2. Test your detections after you write them. Having a detection rule that doesn’t work is worse than not having it at all because it gives you a false sense of (cyber)security. You don’t have to do it in a lab environment every time – often you can validate a rule based on existing logs. If no logs are present then you have to test that rule in a test environment. Remember to capture screenshots to include later in your SOPs.
3. Write SOPs for your detections. Detection rules create alerts. Analysts need to know what to do with them. Remember, that often those alerts are picked up by our junior colleagues who might not intuitively know how to triage them. So write the SOPs. Make them simple, ask analysts to sign off. Rules without SOPs should not be added to your detection library.
I suggest starting with these three basics. As your service matures, you can expand and add approval workflows, track detection performance, fold in self-researched IOCs, and improve the overall process. But if you store your detections in a structured way, test them and remember to write SOPs you’re already doing more than many MSSPs that I know.
SIEM content refresh cycle
My approach to SIEM onboarding leans heavily on threat intelligence. And, as we all know, threat landscape changes over time. The SIEM content we’ve created needs to be refreshed to reflect that. But you can’t add more detections if your SOC (or client’s SOC) can’t handle them.
It’s great to add more detections. It’s better to ensure your SOC runs. Before we write new rules we need to ensure we ‘make room’ for the new alerts.
For ongoing SIEM content refreshes I prefer to establish weekly, and later bi-weekly, meetings with analysts to fine-tune the most frequent alerts.
Once those meetings are set up, I suggest quarterly content refresh meetings where we review the SOC’s throughput and add new detections based on the latest findings from the threat intelligence team.

Ensuring SIEM content is refreshed is not a groundbreaking idea. Rather it is a common decency. SIEM needs to be able to provide good visibility over its entire lifecycle, not only for the first three months after deployment.
Part 3: Monitor Crown Jewels
The final phase of SIEM onboarding begins after we’ve established basic security monitoring processes, centralized alerts in our SIEM of choice (part 1), and created custom content based on threat intelligence (part 2). At this point, we already have a solid, production-ready SIEM. We could stop here, but I believe that adding context regarding your client’s critical systems to the SIEM is the final cherry on top step that needs to be taken.
In this phase, we identify which systems qualify as the client’s crown jewels and plan how to monitor them effectively.
Finding crown jewels
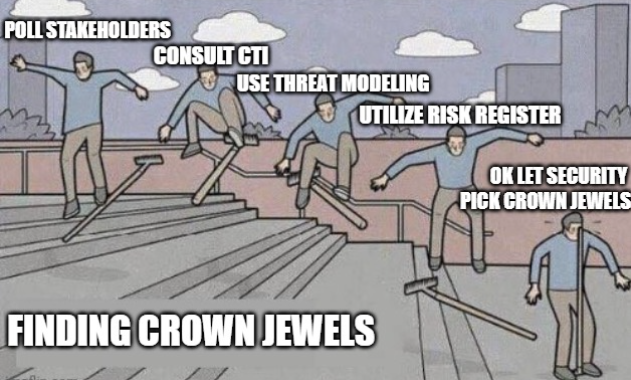
In theory, identifying an organization’s crown jewels should be easy. You ask the client about their most important systems, and they tell you, right?
Actually it’s not that simple. Most organizations don’t have a concept of crown jewels. In 8 out of 10 cases, they’ll need to create that list specifically for your project.
There are several methods clients can use to determine their crown jewels. The most common ones I’ve seen are:
- Surveying stakeholders across different departments.
- Reviewing the risk register and selecting systems with the highest Annualized Loss Expectancy (ALE).
- Assigning a single stakeholder to decide which systems qualify as crown jewels.
- Relying on your guidance and asking which systems are typically considered crown jewels by similar clients.
- MOST COMMON: letting the IT or Security team choose the crown jewels.
It’s funny how often this is the case, but the process of finding crown jewels typically goes through multiple stages, the final being just letting security decide what crown jewels are:
Designating crown jewels is ultimately the client’s responsibility, but you can still guide them in making that decision. Here are two key points I always emphasize:
If everything is a crown jewel, nothing is a crown jewel.
If you have more than five crown jewels, they’re probably not crown jewels: they’re just the systems you like.
What I suggest to avoid this is simple: ask the client to identify between 3 and 5 systems at most. Anything more dilutes the meaning of crown jewels.
I’ve had projects where I didn’t set this expectation, and clients came back with a list of 50+ crown jewels and then complained that we weren’t onboarding all of them into their SIEM. Don’t repeat that mistake. Set the limit early.
Consider NOT explaining why you’re asking for the list of CJs
It might sound counterintuitive, but if the client plans to poll stakeholders about what they consider critical, advise them not to mention that the purpose is heightened monitoring. In my experience, as soon as people hear that, they become defensive and hesitant to provide a concise list worried that if a system gets hit and they didn’t name it a crown jewel, they’ll be held accountable.
A system was hit and I didn’t name it a CJ. Am I accountable now?
Onboarding of Crown Jewels
Now that you have a list of (hopefully) 3-5 systems, you are ready to work. Here’s what you want to do:
IDEALLY: pull data from the crown jewels and write custom detection rules.
This is the main purpose of the exercise. Identify the crown jewels and monitor them. However, this can be tricky since changes to critical systems are rarely simple:
- Crown jewels are often older systems and may not support data export.
- Clients may hesitate to install agents on crown jewels due to security or performance concerns (the irony of avoiding a security solution for security reasons is not lost on me :)).
- Maintenance windows may stretch far beyond your onboarding timeline.
- External technicians or vendors might be required for support.
- Crown jewels may not produce useful or relevant data.
- There may be additional costs involved with exporting data.
If direct data collection isn’t possible: use crown jewels to add context to your existing detections. Automate alert prioritization so that anything related to crown jewels stands out to analysts. Even if you can’t pull logs directly, automation can help highlight events that deal with CJs one way or another.
Adding more context to the SIEM
By this point, you’ve likely spent two months working with the client and have a decent understanding of their environment. You’re now ready to enrich your monitoring setup with context. Crown jewels are a key part of that, but here are three more areas to consider:
- Add simple automation. Start with Teams or Slack notifications for high-severity alerts (simple, but effective). Then move on to automated lookups for IPs, hashes, domains to speed up investigations.
- Add high-value user context. Identify key users in the organization. Use Active Directory or Entra (if it’s complete) to create a watchlist of all Directors and above. For larger organizations narrow it to VPs and above.
- Add IOCs. If you can prepare a curated list of high-fidelity indicators of compromise, integrate them into your SIEM.
And that’s it. You’ve built a production ready SIEM. Congratulations.
Finishing touches
To sum up, you’ve gone through all three phases of SIEM onboarding:
- Pre-onboarding: You sent out a questionnaire and built a threat landscape report based on the client’s vertical and geography. That report outlined the top 5-10 MITRE techniques likely to be used against the client, and ideally, you drafted detections for them at this stage.
- Phase 1: You centralized security alerts in the SIEM and established basic monitoring processes.
- Phase 2: You used the threat landscape report to create custom detection rules tailored to the client.
- Phase 3: You focused on crown jewels and added context to make monitoring more effective.
All of this took roughly three months and delivered a strong, operational SIEM.
Now you’re ready to finalize the documentation and hand the environment over for monitoring. Don’t forget to get formal confirmation from the client that they’re satisfied with the project. It’s always good to be safe. 🙂
And that’s my three-phase SIEM onboarding approach, developed through plenty of trial and error. If there is one way you take from these series I’d like it to be the value of relying on threat intelligence to build a SIEM.
As an MSSP, you want reusable content. Your clients want custom solutions. By using threat intelligence and basing your detection strategy on MITRE techniques, you can find the right balance of doing repeatable work while still delivering solutions that feel tailored to each client.
Feel free to steal this approach. And if something’s not clear – hit me up on Linkedin: https://www.linkedin.com/in/rafal-kitab/


Leave a reply to Top 3 SIEM deployment anti-patterns – SecOps at home Cancel reply